

If you saw my post a️bout Harry's first birthday party you would have seen the birthday "chalkboard" I made all by myself *smiles a big chuffed smile*! It was actually super easy to
make but took some planning and careful calligraphy!
If you would like to make your own birthday chalkboard,
rather than paying the £25+ that Etsy demands, then keep reading!

You will need:
*a black foam board (mine is an A1 from Hobbycraft)
*metallic pens (mine are Papermania Fluid Metallic Pens that are specifically for writing on dark
backgrounds)
*a ruler
*a pencil
*a rubber
*some scrap paper for drafting
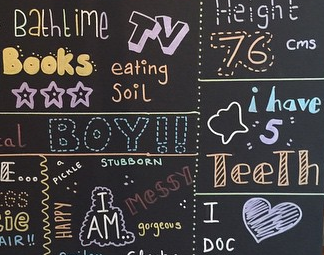
Firstly you want to jot down some ideas for your board,
things like what your little one is loving right now, how many teeth they have, favourite book, what they weigh or measure, what they dislike, things that they can do etc etc
etc..
Secondly you want to draft your design on a plain piece of
paper. Use a pencil and rubber as you will need to play around a bit to see which bits you
can fit where
 |
| Font styles from DaFont.com |
I used a website called da font to copy various fonts onto my board although you can just make up your own or
doodle it in your own handwriting!
Once you are happy with your layout transfer it carefully
into your foam board, again with pencil so you can correct any mistakes -
unless you are brave enough to go straight in with your pens!!!
Then go over your wording with your metallics adding
little drawings, stars, hearts, crowns or whatever fits with your theme! Use a ruler to section off your writing but be careful making sure its straight!

I hope you enjoyed this tutorial! Will you be making a birthday
chalkboard??!
